Sending Zen Cart bulk email

The ability to send email from your cart and have it be received by customers is critically important. Assuming you are already following best practices and not sending unwanted email, the best way to safeguard your sending reputation is to not send bulk emails using the same mechanism you use to send transactional emails.

I have introduced a new PR into Zen Cart 1.5.8 (which can be backported to 1.5.7 if needed) to facilitate this. A new set of configuration parameters allows you to identify an email sender (like SMTP2Go, SendGrid, etc.) for bulk email, which is completely separate from your regular email sender. Let me know your thoughts on Configuration settings for non-transactional email, PR#4662.

Zen Cart – MailChimp Integration

My Zen Cart – MailChimp integrations have received the following updates:

  • Fixed bug in API integration:
    The original integration had error checking that was based on the 1.3 API, and lo longer work.  So while the success path logic was all correct, the error handling was wrong.
  • Added instructions for changing Zen Cart newsletter page:
    The original Zen Cart integration only handled signup on the account creation page. Now users may subscribe or unsubscribe on the newsletter page (which is linked to on the My Account page as /index.php?main_page=account_newsletters.
  • Removed double opt in:
    At the request of ecommerce companies, MailChimp has changed the default subscribe behavior so that double opt in is no longer required.  Users who prefer the prior behavior can still change it back by modifying the PHP API (includes/functions/extra_functions/mailchimp.php) to set status based on $options[‘status’] rather than just to subscribed.
  • Moved MailChimp error log to /logs folder:
    In the event of an error, the MailChimp.log file was being written to the /cache folder; it is now written to the /logs folder where it is more likely to be noticed (since most logfiles have been migrated there in Zen Cart 1.5+).

You can see the updates in my ZenCart MailChimp and ZenCart Newsletter Discount contributions, and  my MailChimp Integration for Zen Cart GitHub repository.

How to style the EXTRA_INFO block in Zen Cart HTML emails

By default, if you look at the HTML emails sent by Zen Cart, the $EXTRA_INFO block is unstyled.   So it doesn’t fit in with the rest of the content, which is styled.

Fixing this problem easy.  Just modify the templates that use this variable (email/*.html) and change

$EXTRA_INFO

to

<div class="xextra-info">
$EXTRA_INFO
</div>

Then instead of this:
EXTRA_INFO fixed in Zen Cart HTML email template
you will see this:
EXTRA_INFO fixed in Zen Cart HTML email template

If you want to see a complete execution of this change, you can look at my Zen Cart 1.5.6 Pull Request to fix this issue.

Capturing and Filtering on Interests in Mailchimp

If you are willing to send multiple newsletters every month (I think the minimum cadence should be monthly), and you want to do some market segmentation, you may want to try this technique.   It assumes you have already installed my Mailchimp Integration for Zen Cart.

  1. Login to Mailchimp and click the Lists menu at the top.  Then on the right, click the Stats dropdown and select Signup forms.
  2. Click the Select button on Embedded Forms.
  3. Under Manage Contacts, click Groups.
  4. Click the Create Groups button, and add Checkboxes and Radio buttons as need be.  You can add many Groups, so don’t be afraid to partition your questions.
  5. Click Signup Forms and Embedded Forms again.  The code for the form shown in the preview is right below the preview window.  Copy this code and paste it into a new page (or sidebox) on your site.

You can read more about creating groups on the Mailchimp Getting Started with Groups page.

So after a while you’ll (hopefully!) have some newsletter signups, with people identifying as being part of one group or another. How do you utilize this data?

  1. Select Campaigns, name the campaign and make it a regular campaign.
  2. You will be prompted to select Recipients.  Select Group or New Segment.
  3. Use the query-by-example form to select the target group for your campaign.

You can read more about this on the Mailchimp Sending to Groups page.

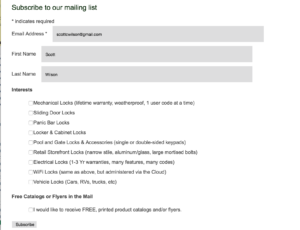
As a convincer, see the email signup form we are using on keylessentrylocks.com: