 eCommerce with Zen Cart!
MailChimp Integration for Zen Cart
A Zen Cart™ mod which allows you to use newsletter services from MailChimp instead of the native Zen Cart mailer.This mod was formerly called "MailChimp Newsletter Sidebox," but now subscription is available during account creation as well.
Donate: This is free software. Show your appreciation by supporting my efforts.

Relevance: Zen Cart™ 1.3.0 - 1.3.9, 1.5.x
Current Version: 4.2 (MailChimp API 3.0) (version history)
Note: You must use the same version of the MailChimp API in both the MailChimp integration and Newsletter Discounts (if you use both). You cannot mix API versions! The old Newsletter Discount module uses the MailChimp Admin Userid and Password; if you are using this one, you must upgrade.
Support Thread: MailChimp Integration Support Thread
Cost: Free, but donation appreciated
Installed Cost: $300 Buy Professional Installation by That Software Guy
Installation Difficulty: Moderate-High The MailChimp staff changes their website frequently, so these instructions may not exactly match what you see on their site.
Installation Instructions: click here
Common Installation Problems: click here
Github Repo: Github Repo for Zen Cart Mailchimp Integration
Location: Zen Cart Plugins, under Marketing Tools.
Download: MailChimp Integration in Zen Cart Plugins
Add-Ons: The Newsletter Discount contribution interoperates with the MailChimp Newsletter Sidebox.
Overview:
MailChimp is a great newsletter management service that has a per- message pricing model. This makes it much more affordable than Constant Contact (which bills by the month) for small businesses with infrequent bulk emailing needs.Yes, Zen Cart has a built in newsletter service. However,
- MailChimp has a whole set of very sophisticated HTML templates that are provided free.
- The MailChimp service is de-coupled from your store, making it easier to sign up people who may not want to create an account.
- Having a third party send your commercial email makes it less likely that your hosting provider will cancel your account or push you into a more expensive plan due to excessive resource usage.
- MailChimp has a ton of analytics tools that show you how many people opened your email, clicked on links, etc.
To sign up for their service, go to www.mailchimp.com
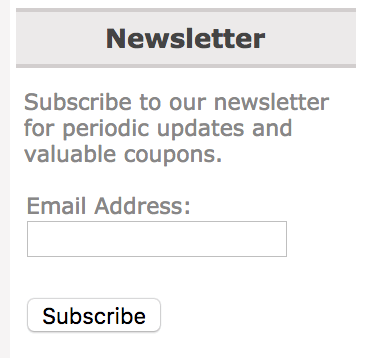
MailChimp Integration includes a sidebox in which people can subscribe to a newsletter provided by MailChimp.com, and allows your customers to also signup when they create an account.
MailChimp Newsletter Sidebox
Preinstallation Instructions:
- Read the MailChimp Email Marketing Guide and some of the resources offered by MailChimp.
- Sign up for a MailChimp Account.
- If you are working with a developer: At the lower left, you'll see a button for your account. Click it, and select Settings > Users and press Invite a User. Enter your developer's email address and set their account to be Admin, then press the Send Invite button.
- If you do not already have an email list, create a list for your newsletter. Press the Audiences icon and create an audience. In your Sign-up form, I suggest only having email address; if you want more fields, you'll have to modify this contribution.
- After you have created your Audience, at the right hand side of the page is a dropdown.
Press this and click the
Signup forms link.
Click Embedded Forms.
Press the Condensed (formerly "Super Slim") link.
On the right hand side of the page is the code, in a box labelled "Copy/paste onto your site." At the top of the form will be something that looks like this:
<form action="//SOMETHING.list-manage.com/subscribe/post?"
Note this URL - you will be embedding it in the language file during the installation process.
Below that will be some URL parameters that look like this:
u=abcdefea39477581bfabcde04&id=e13342637c" method="post" ...
Note the the values of "u" and "id" from this string - you will be embedding them in the language file during the installation process.
Finally, you will see something that looks like this:<!-- real people should not fill this in and expect good things - do not remove this or risk form bot signups--> <div style="position: absolute; left: -5000px;" aria-hidden="true"><input type="text" name="b_b60439f2acd09c63e0b47fcea_780a74207b" tabindex="-1" value=""></div>Note the code between the open and close <div> tags; you will use it later. - Now click on your company name in the link on the bottom left hand side of the page. (It might also be your name if you didn't sign up as a company.) Click on Account, then click on Extras, and select API keys. Click the "Create A Key" button. Note the value of the API Key; you will be embedding it in the language file during the installation process.
Installation Instructions:
- Back up everything! Try this in a test environment prior to installing it on a live shop.
- Copy the contents of the unzipped folder to the root directory of your shop.
- Edit the file
includes/languages/english/extra_definitions/mailchimp_sidebox_defines.php- Set the BOX_MAILCHIMP_NEWSLETTER_ID to the "id" value you noted during the preinstallation instructions.
- Set the BOX_MAILCHIMP_NEWSLETTER_U to the "u" value you noted during the preinstallation instructions.
- Set BOX_MAILCHIMP_NEWSLETTER_URL to the URL value you noted during the preinstallation instructions.
- Set BOX_MAILCHIMP_APIKEY to the value you noted during the preinstallation instructions.
- Edit the file
includes/templates/template_default/sideboxes/tpl_mailchimp_sidebox.phpLook for// Put the bot signup prevention code here.Using the example above, it would look like:$content .= '<div style="position: absolute; left: -5000px;" aria-hidden="true"><input type="text" name="b_b60439f2acd09c63e0b47fcea_780a74207b" tabindex="-1" value=""></div>'; - In Admin > Tools > Layout Boxes Controller, turn on the mailchimp sidebox.
- Changes to your Zen Cart configuration:
- In Configuration > Customer Details, set Show Newsletter Checkbox to 1.
- In Configuration > Email Options, set Display 'Newsletter Unsubscribe' Link to false.
(To unsubscribe, your customers use the unsubscribe link at the bottom of the newsletter or use the newsletter link on the My Account page.)
-
If you do not yet have an
includes/modules/YOUR_TEMPLATE/create_account.php
then copyincludes/modules/create_account.php to
toincludes/modules/YOUR_TEMPLATE/create_account.php
Look for the line that starts with:$zco_notifier->notify('NOTIFY_LOGIN_SUCCESS_VIA_CREATE_ACCOUNT' ...(There are more parameters after this in Zen Cart 1.5.5 and higher.)
right below this line, add the code:if ((int)$newsletter == 1) { mailchimp_add($email_address); } -
In
includes/modules/pages/account_newsletters/header_php.php
change$newsletter_query = "SELECT customers_newsletter
to$newsletter_query = "SELECT customers_newsletter, customers_email_address
Then right above$sql = "UPDATE " . TABLE_CUSTOMERS . "
add// Not the same? Then update MailChimp $email_address = $newsletter->fields['customers_email_address']; if ($newsletter_general == '0') { mailchimp_del($email_address); } else { mailchimp_add($email_address); }
Installation Problems:
- If after installation you are getting the message, "monkeys must have stolen the page" when you try to subscribe, it is possible that you have the values BOX_MAILCHIMP_NEWSLETTER_U and BOX_MAILCHIMP_NEWSLETTER_ID in mailchimp_sidebox_defines.php backwards. The value BOX_MAILCHIMP_NEWSLETTER_U should be the longer of the two.
- If subscriptions from Account Creation are not working, you may
not have set the API KEY field in the file
includes/languages/english/extra_definitions/mailchimp_sidebox_defines.php - If subscribing during the account creation process doesn't work, check the logfile in DIR_FS_SQL_CACHE/MailChimp.log.
- When you are testing, note that the new subscriber will not show up in the list until they have responded to the confirmation email they get from MailChimp. (It takes a few minutes after that in fact; there's some caching in the MailChimp lists.) To confirm that a userid is on a list, click the "Lists" link at the left hand side of the MailChimp page, and on your list, right click the dropdown button on the right, and select "Manage Subscribers." Then click "View All Subscribers." Then at the right hand side of the table, click the Date Added header to sort by Date Added (descending).
-
If you are not using Sideboxes on your cart but you still want to allow signups
from people, you can modify the My Account page (or your template footer,
or whatever else you wish)
to show a subscribe link (hosted by MailChimp).
Click Lists at the left hand side of the page, go to your list and click the
dropdown at the right side of the page for your list, then click
General Forms, then copy the Signup form URL.
This is the URL of your email list signup page (hosted by MailChimp). You can add this anywhere to your site so that people can sign up without creating an account.
Before you leave this page: click the "Let subscribers pick email format" checkbox, and cursor into the FirstName and LastName fields, and delete them using the "-" button. -
If you are using
Newsletter Discount, and you
want to show off the discount in the sidebox, add this block to
includes/templates/template_default/sideboxes/tpl_mailchimp_sidebox.phpright after the "</form>:if (MODULE_ORDER_TOTAL_NEWSLETTER_DISCOUNT_AMOUNT > 0) { $content .= "Newsletter subscribers enjoy a " . MODULE_ORDER_TOTAL_NEWSLETTER_DISCOUNT_AMOUNT ."% discount!"; }Your sidebox will now look like this:
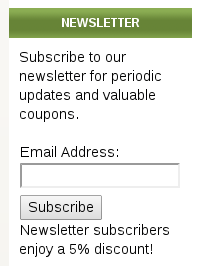
Since Discount Preview does not support Newsletter Discount, this is a good compromise.
Of course, a similar change could be made inincludes/templates/YOUR_TEMPLATE/templates/tpl_modules_create_account.phpto show the discount when account creation was being done (to incentivize newsletter subscription at that point). - You may want to do additional styling to the sidebox. On the responsive template, I think making the email input field 150px wide and giving the submit button a background color looks better, but use your judgment.
Importing your Zen Cart Newsletter Subscriber List
To export a list of customers who are have signed up for your Zen Cart newsletter and import them into MailChimp, use the following procedure. I will assume you don't use a prefix for your table names; if you do, change customers to <your_prefix>_customers.- Go into phpMyAdmin and select your database. Select the table "customers."
- Press the SQL button and enter the query
SELECT customers_email_address FROM customers WHERE customers_newsletter = 1
(Note that if you are using a prefix you will need to include it in the table name in this command, for example, FROM zen_customers if the prefix is "zen_") - At the bottom of the screen, you'll see a label that says "Query results operations". In the box below it, you'll see an "Export" link. Press it.
- You will now see the "Export" screen. Set the Export method to "Custom" and the Export type to "CSV for MS Excel." Set "Fields enclosed by" (or "Columns enclosed with") to be blank (not double quote). Click the Save output to a file radio button.
- Press the Go Button.
- In another window, log in to MailChimp, and press the Lists button.
- Click the dropdown at the right hand end of the row containing your newsletter list, and click Import.
- Upload your list from the file you exported from phpMyAdmin. Note: If you didn't follow the instructions above, and your csv export is quote delimited, you should remove the quotes prior to importing so that the file is only a list of email addresses without any quotes or other delimiters.
If you've never had a newsletter before, and you want to see get permission from your existing customers, MailChimp has some suggestions. Zen Cart's email facility has a very useful filter: under Tools > Send Email, the "Customer" dropdown list has a selection entitled "Active customers in past 3 months." Be careful when you're doing this; the last thing you want is for customers to perceive you as a spammer.
This would probably be a good time to update your Privacy Policy. In admin, go to Tools > Define Pages Editor, and select "define_privacy.php." This file will be made visible if you use the "Information" sidebox (Admin > Tools > Layout Boxes Controller, turn sideboxes/information.php ON).
MultiLanguage Newsletters
With no software change, you can accommodate all the languages your cart supports. You will need to create a second newsletter list in MailChimp in the other language you support, and make a note of this list's id. Simply copy the file
./includes/languages/english/extra_definitions/mailchimp_sidebox_defines.php
to your other language directory (for instance, if your other language is Klingon, it would be
./includes/languages/klingon/extra_definitions/mailchimp_sidebox_defines.php
Then set the value BOX_MAILCHIMP_NEWSLETTER_ID in that file to the list id of your
second list.
Providing Archives of your MailChimp Newsletter
MailChimp provides an archive service. It gives you a little snippet of javascript which retrieves links to the last <n> newsletters you sent. You can either paste that code into an EZ Page, or you can use the About Us contribution to create a Newsletter Page.Learning more about Newsletters
See the learning more section of the Newsletter Discount page.Major Versions
- 4.2 11/15/2018 - Fixed API integration issues; added newsletter page.
- 4.1 10/01/2017 - Updated installation instructions & signup form.
- 4.0 10/23/2016 - MailChimp API 3.0.
- 3.0a 11/20/2013 - Small bug in sidebox fixed. Thanks to Lunabug on the Zen Cart forum for reporting this.
- 3.0 05/01/2012 - Update to MailChimp API 1.3
- 2.2a 07/16/2011 - Fixed validation issues.
- 2.2 03/12/2011 - Updated instructions to reflect latest MailChimp policies.
- 2.1 10/02/2010 - Updated instructions to reflect latest MailChimp policies.
- 2.0 08/01/2010 - Added mailchimp subscribe at signup - MailChimp API 1.2
- 1.2 08/25/2008 - updated install instructions and form for MailChimp API 1.1.
- 1.1 08/05/2007 - Put files in template directories for easier upgrade
- 1.0 06/22/2007 - First Release