PayPal’s New Download format – Big Red Consulting to the rescue!

If you are importing PayPal transactions (from your Zen Cart!) to Quickbooks using PayPal to QB Link from Big Red Consulting, you need the new version of this software to deal with Paypal’s new download format!  PayPal finally did away with their legacy downloader (and its associated format), and now all users must use the new download interface.  This is a new change; as recently as Oct 1, 2018, I was able to use the Legacy downloader.

Grab the updated PayPal to QB Link (sometimes just called PayPal Link) here: http://bigredconsulting.com/latest-version-info/

You will need to re-import your QB lists and modify the download format within PayPal, but the documentation will lead you through all of this.  BIG UPS to Big Red Consulting for being 100% prepared for this PayPal change!

Printing Mailing Labels from Salesforce

Thanksgiving and Christmas are just around the corner – would you like to send cards to your customers?  Doing this with Salesforce and a Dymo printer is quite straightforward.

You may want to create a new field in your Contacts account that allows you to mark customers who should receive cards.  I have a Status field that allows me to find customers who have a Support agreement with me, and I select on that basis.  (If you’re unsure how to add a new field to an object, watch this video from Salesforce.)

In Salesforce, go to Reports->New Report.   Select “Accounts & Contacts,” and use the report type “Contacts & Accounts.”   Update the columns so you use the following fields:


First Name Last Name Account Name Mailing Street Mailing City Mailing State/Province Mailing Zip/Postal Code

If required, you can also add Mailing Country.  Once you have all your fields selected, use filters to reduce the list to only the contacts you want, selecting on the field you used to determine if the contact gets a card.  In my case, that would be the Status field.  Then do an Export, and choose “Details Only” with format CSV.

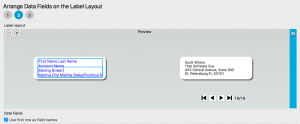
In the Dymo Label app on your computer, use File->Import Data->New.  The default label is Address Barcode on Top, but you can change this if you like.  I like the address label without a barcode.  Select your data file (the CSV you just created from Salesforce), and click Next.  On the “Arrange Data Fields on the Label Layout” page, check the box labelled “Use first row as field names.”  To create the label, you just double click on each field, and lay it out on the label.  By the time you’re done, you should have something like this:

Dymo label for Salesforce Contact

Now just print them out and get cracking on those holiday cards!

From Zen Cart to Salesforce – Handling Accounts

Unlike most B2C e-commerce systems, Salesforce makes a distinction between Contacts, which are identified by an email address, and Accounts, which are identified by a name and site.  Contacts belong to an Account, and an Account may have many Contacts.

The way I handled this relationship in the first version of  Zen Cart to Salesforce was simply use the email address as the Account name. This has a significant advantage, since the email address for a shopping cart account is an immutable field.

However, some larger customers have multiple email addresses associated with a single account.   Also, some customers had e-mail address changes over the life of their relationship with me.

For these reasons, I decided to add a “salesforce_account_name”  field to the customers table.  I populate this only in cases where the email address is not sufficient.   I also had to modify the customer export script to export that field rather than the email address in the Account column of the CSV when it was set.

This new way of handling Accounts is reflected in the 360 Sales Reporting modification I did, to get more accurate per-account sales data.

Showing Zen Cart Customer Updates needed by Salesforce

If you’ve installed my Zen Cart to Salesforce Customer Import tool, and done a few exports of customers from your admin, you’d probably like an easy way to see how many updates (if any) are outstanding when you login to your Zen Admin.

I have made a small modification to the admin dashboard (in Zen Cart 1.5.5) to do this, which is described below.  Steps:

a) Add the define BOX_ENTRY_UPDATES_TO_SALESFORCE to admin/includes/languages/english/index.php.

define('BOX_ENTRY_UPDATES_TO_SALESFORCE','New/Updated records for Salesforce');

b) Add the logic to calculate and display the number of new/updated records to admin/index_dashboard.php.

Calculate it below the salemaker query on line 31:

$last_export = $db->Execute("SELECT * FROM " . TABLE_SFDC_CONFIG);
$last_customers_export = $last_export->fields['last_customers_export'];
$salesforce_customers_query = "SELECT count(*) AS count FROM " . 
   TABLE_CUSTOMERS . " c, " . TABLE_ADDRESS_BOOK . " a, " . 
   TABLE_CUSTOMERS_INFO . " ci WHERE a.customers_id = c.customers_id 
   AND a.address_book_id = c.customers_default_address_id AND 
   ci.customers_info_id = c.customers_id AND 
   (ci.customers_info_date_account_created > '" . 
   $last_customers_export . "' OR 
   ci.customers_info_date_account_last_modified > '" . 
   $last_customers_export . "')";
$salesforce = $db->Execute($salesforce_customers_query);

Now display it below the customers count display on line 72:

 
echo '<div class="row"><span class="left">
   <a href="' . zen_href_link(FILENAME_SFDC_EXPORT_CUSTOMERS) . '">' . 
   BOX_ENTRY_UPDATES_TO_SALESFORCE . '</a></span>
   <span class="rigth"> ' . $salesforce->fields['count'] . '</span></div>';

The typo in the class name right is required in Zen Cart 1.5.5; it has been fixed in Zen Cart 1.5.6.

Lifetime Customer Value for Zen Cart customers

When coach Ryan Waggoner asked me about the lifetime value of my average customer, I was embarrassed to say I didn’t know!  So I added Lifetime Customer Value to the Zen Cart Admin->Customers page in this pull request.  The change is now in the 1.5.6 branch, but it can be easily backported to any 1.5.x version of Zen Cart.  It’s a great way to get visibility into the activity of all you customers, and especially your most valuable ones.

Wild Dove Messaging System for Zen Cart

Got this from a client in Hawaii:

Scott,

I continue to be impressed with your use of innovative communication systems, especially those custom designed for customers dealing in bioresources!

While I was doing hours of Zen Cart meditations, your messenger flew into the office.

We were a little offended by the fresh avian “software” downloaded on the desk but I did get the message…

Aloha,
Ed

Wild Dove in Hawaii

Dreamforce 2018 – talking about small business

Dreamforce is the largest software conference in the world, drawing over 170,000 participants from all over the world to San Francisco, California.  The topic?  Salesforce.

I was fortunate to be selected to share my experience with Salesforce Essentials (and talk about small business in general) at this year’s Dreamforce conference. This was the quote I liked the best, which was shared by the Salesforce SMB team on Twitter.

That Software Guy at Dreamforce 2018.

Promoting Zen Cart cross-sells created with Discount Chooser

Zen Cart Discount Chooser (also known as Free Gift Chooser) is a great way to create cross-selling promotions (Buy product A, get product B at a discount) for your shopping cart.  However, because the configurability of the promotions has so many possibilities, I was never able to create a module like Better Together Checkout Candy for Zen Cart, which notices that A is in the cart and prompts the customer to buy B.

Because I recognized that customers needed some sort of promotional mechanism, I created Big Upsell for Zen Cart, which shows the available offers on the Shopping Cart and Checkout Shipping pages. Using Big Upsell, in conjunction with Discount Preview (which shows the discount once the customer has purchased all the components of the promotion), allows you to more effectively promote the discounts you have created.